Berry sweet indeed! This Decor Transfer features a variety of berry images for you to add to your favourite pieces - think charcuterie boards, chargers and more! Smaller footprint, huge impact! Our 6" x 12" Decor Transfers® offer the same high quality as our standard transfers with a smaller size perfect to add a touch of flair to all your decor, mixed media and crafting projects with our Small Decor Transfers® featuring a variety of vibrant designs. These transfers are great for adding small elements to all of your projects.
Transfer Dimensions:
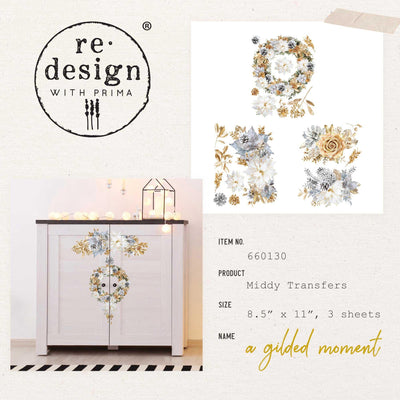
Sheets - 3
Width - 30 cm (12”)
Height - 15 cm (6”)
Please Note - this transfer comes in individual images that can be cut out for easy placement. Each image is an individual transfer for application onto your project.
How To Apply Your Transfer (full instructions are also included with your transfer):
Apply to a clean dry surface. For painted surfaces, allow at least 48 hours for your paint to fully cure before applying the transfer (longer if the conditions are cold and drying times are extended).
Each transfer consists of two sheets, one is the matte release paper and the other is a transparent paper with the printed adhesive transfer itself. Handle carefully when removing from packaging and placing on to the desired position as the transfer is extremely thin and sticky and, once adhered, will be impossible to remove without tearing. Also included is a wood application tool which rubs down the design onto the surface. Although we recommend using our Redesign Transfer Tool which is especially useful for our larger transfers.
1. With the release paper still attached, experiment with where you want to place the transfer sections on your project (TIP - when working on furniture it is often very helpful to lay your piece on its back so that the front is facing upwards and remember to check where your hardware will go, so that you don’t end up covering over a piece of the design you want on show when you replace handles etc).
2. Gently pull back the release paper 1 to 2 inches from the top edge of the transfer. If working with a large design, tape down the top released corners of the transfer to ensure that the rub-on stays exactly in place while doing the transfer. Then slowly and carefully remove the rest of the release paper and tape down the corner and edges every few inches of the transfer (TOP TIP - try using Low Tack Frog Tape when applying over painted surfaces. Cheaper, masking tapes may pull your paint off when you remove).
3. Working from the top to the bottom, rub off the design using the wooden stick provided or the Redesign Transfer Tool, ensuring as you carefully pull away the transparent film that the transfer has fully released and none of the small details have been missed. If anything has been missed, lay the transfer back down and go over the area again.
4. Once the entire design has been transferred, make any touch ups desired and gently smooth down any bubbles or edges by rubbing gently with a soft cloth.
To Remove A Transfer:
If you ever need to remove your transfer, gently scrape off with your transfer tool. It may also help to soften the adhesive by use if a hair dryer.
Included in this product are - single transfer (in several sections), wooden spatula, full instructions.
Colour Accuracy Disclaimer
Whilst we’ve taken every effort to craft the colours you see on screen to accurately reflect the colours of this item, due to differences in screen settings, we cannot guarantee an exact colour match. If you have concerns about the colour match of this item please contact us and we will do our best to help you.
SKU: 657376
 Skip to content